You’re going to make an image of burning letters, such as the ones in this example. The objective is to create a realistic effect.
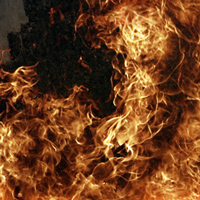
You must use a similar setting–with a floor and a wall–but you are free to use your own (high-res) textures. You’re also free to choose any font and to write whatever you like of course. For the flames I’ve provided a texture file, but many similar images can be found online (i.e. Google Images).
Time: 60 minutes
So first off; we need to set the stage. Let’s create the environment where the letters are at. Download this zipfile to get started.

- Open the grunge background texture in Photoshop.
- Place the floor texture in your composition by dragging it in or using File > Place Embedded
- Select the Move and make sure “Show Transform Controls” is checked.
- Transform the floor texture to the right perspective (hold down CMD-Option-Shift and drag a corner).
Now let’s place some text and give this a ‘hot’ look using layer effects.
- Place a text (for instance your name) in the center of your composition.
- Double-click an empty spot on the layer (to the right of the layer name) to open its effects.
- Use these layer effects to create the glowing edges:
- outer glow (color: red, size 10px)
- inner glow (color: white, blending mode: color dodge, size 20px)
- color overlay (color: yellow-terracotta)
- satin (color: dark red, distance 10px, size 10px)
Now let’s add some flames. In order to place these flames with the right amount of transparency we’re going to use a color channel to select them.

- Open the flames texture in a separate window
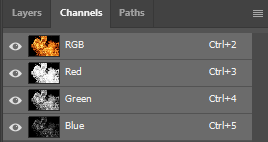
- Open the channels panel and note the different black/white versions of the flames in each channel.
- CMD (or CTRL)-click the channel’s thumbnail.
This makes a selection of the channel as based on the black/white information. - Make sure all channels are active (see image to the right) and press CMD-C to copy this into memory.
- Go back to your composition and paste the flames with CMD-V.
You should see transparency in your flames. - Mask out parts of the flames you don’t want to show.
- If needed, add more flames by using different flame layers.
Now we’re going to adjust the lighting to fit the scene. We will use adjustment-layers to create the right amount of light. We will use a Color fill adjustment layer to create yellow light coming from the flames.
- Place a Brightness/Contrast adjustment layer before the background (floor and wall) and adjust the brightness/contrast to fit the scene.
- Create a Color fill adjustment layer above your background and color it with orange- yellow.
- Set the blending mode of this layer to Vivid light and the opacity to 50%.
- Give this layer a mask, select the mask and fill it with black.
- Select a large, soft brush and set its opacity to 10% and the color to white.
- Draw on the mask to draw the light reflected from the flames in your composition.
The final step is to distort the letters, as if they have partially melted or you’re seeing a visual distortion from the heat. Text is a vector by default. We need to transform it into pixels by rasterizing the layer in order to distort the letters.

- First, duplicate the letters layer into a new layer and hide the original layer.
This is because we’re going to distort the original layer and we might want to be able to go back to our letters later on. So this is safety precaution. - Right-click the copied text layer and select Rasterize Type.
- Use the eraser and smudge tool (uncheck fingerpaint) to distort the letters
- Clean up the file (remove unused layers, but do not flatten or merge) and save your work in PSD format.