You’re going to create a simple poster using text and images. This exercise is a starting point, feel free to experiment with different layouts, typography, color and image manipulation options, and to explore all the features and tools in Indesign.
Time: 60 minutes
Setup
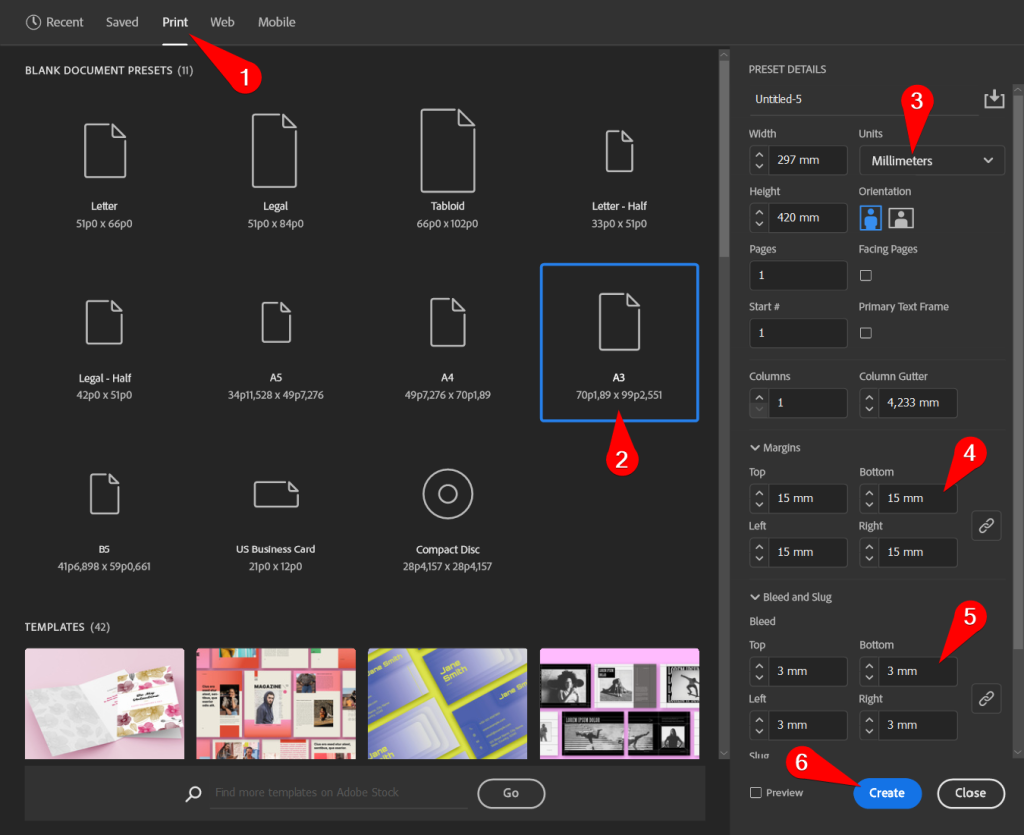
- Choose File > New and click Print. Expand “View All Presets”.
- Choose A3
- Choose Millimeters
- Set Margins to 15 mm
- Set Bleed to 3 mm
- Click Create.
When graphics run up to the edge of a paper, Bleed provides a margin of error when the print is cut from a larger sheet, in order to avoid white, unprinted page edges.
You can find this margin as a red line around your document.
Text AND LAYOUT
Your poster can be about anything you like. For instance: if the last six months of your life were a movie, what would that poster look like?
If you want something else, check this site for inspiration.
- Create a Text Frame for each text element. Sticking with the example above, you could think of these:
- Title
- Tagline
- Writer and/or Director
- 1st, 2nd, 3rd billed Cast
- Fine print
- Make an arrangement. Play around with size and position.
- Try to assess the hierarchy of the design: in what order does your eye perceive it? What grabs the attention first, second, etc.? Is this in line with what you want to say?
IMAGES
Use images you find online or that you shot yourself. Images have a big impact on the look & feel of your design. Pick a really great image, preferably of a large pixel size.
- Place your image(s) using CMD.CTRL-D.
- If you want, you can edit your image in Photoshop and place a PSD in Indesign. For instance to improve colors.
- Also, you can place vector graphics of EPS or AI file type.
PSD and AI files placed inside Indesign and opened in Photoshop / Illustrator at the same time will automatically update all changes when saved.
checks
Two common checks are: edge aligned graphics must run up to the bleed line and graphics need a minimum effective resolution (in this case 150 dpi).
- The first check is visual. Make sure you check all the edges for graphics that run against or over the page edge. In these cases they must exceed the page edge at least up until the bleed line.
- Choose Window > Links to open up the Links palette.
- Select the image to inspect.
- Expand the bottom half and find “Effective Resolution”. Make sure this is at least the required 150 ppi. Scale images down to increase the effective resolution.
Save your work
Save a copy of the .indd work-document for yourself. Export a pdf to hand in.
- Choose File > Save and save the indd file to your OneDrive or other cloud storage.
- Choose File > Adobe PDF Presets > High Quality Print
- In the option dialog that follows, leave everything as is and click OK.
Hand this PDF in through Teams. Use the .indd file you saved to continue working on this design at a later stage.


