 When working with vectors, Illustrator is your weapon of choice. Whether it is logo design, pattern design, illustration, architectural or even technical design, Illustrator offers many different tools to suit your needs. Let’s take a look at some of the basics.
Time: 90 minutes
In this exercise we will address the following subjects:
- Patterns
- Opacity masks
- Pathfinder
- Appearance
- Brushes
When you are done you will have created something similar to this:

Creating a pattern
- Open a new Illustrator document. In the Open File dialog, select A4 under Print. Select Landscape for orientation.
- Select the Star Tool and draw a small star.
- Make sure the star is selected, then use the color pickers in the properties bar to give the star a fill color and a stroke color.
- Make sure the stroke is visible by giving it a decent thickness.
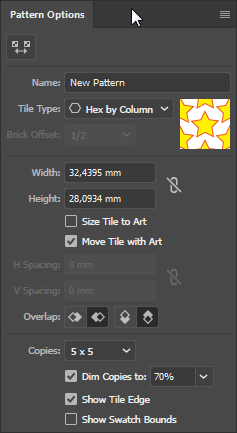
- With the star object selected go to Window > Pattern Options.
 Open the context menu of the Pattern Options palette and select Make Pattern. (You may get a message saying it got added to Swatches, just click OK.)
- Set the Tile Type to Hex by Column.
- Click the Pattern Tile Tool in the top left.
- Hold down Alt and Shift while dragging one of the handles.
- Give the pattern a spacing that you like.
- When you are done click Done in the top of your work area. The pattern has been created and added to your Swatches palette.
- Select the star shape. Now hold down Shift and drag the corner handles to scale it up to the height of your artboard.
- With the star shape selected, click the newly created pattern in the Swatches palette.
- Optional: You can create a pattern out of any Shape. Create a different design and experiment with the settings in the Pattern Options Palette.
Creating an Opacity Mask
- Continuing from above, select the star path in the layers palette.
- From the contextmenu of the Layers palette, select Duplicate.
- Go to Window > Gradients. In the Gradients palette, set Type to Radial. This should fill the new star with a black-white gradient.
- In the properties bar, set stroke color to None.
- Now press Cmd-X to cut the shape and copy it to memory.
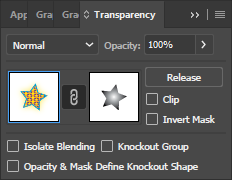
- Select the original star shape. Go to Window > Transparency and click Make Mask.
 Select the mask thumbnail and press Cmd-F (Paste in Front). This pastes to the exact location from where it was cut.
- Now uncheck Clip in the Transparency palette.
- Click the Object thumbnail in the Transparency palette to get out of Opacity Mask mode.
- Double click the Select tool and check Transform Patterns. Press OK.
- Scale the shape down to half the height and move it to a corner of your artboard.
- Optional: in Mask Mode, rotate the mask a couple of degrees sideways relative to the star object. And back out of Mask mode, rotate the star object sideways a bit as well.
Using the Pathfinder
- Continuing from above, deselect the star shape by clicking an empty spot with the selection tool.
- Press D to reset the shape properties to default and select a red fill color.
- Use the Rectangle tool to draw a square.
- Use the Ellipse tool to draw a small circle and position this over one of the square’s corners.
- Select a blue fill color for the circle.
- Use the Select tool and hold Shift to select both shapes. Use Cmd-C and Cmd-V to make a copy of the two shapes.
- Go to Window > Pathfinder.
 With the copied objects still both selected, choose Minus Front under Shape Modes in the Pathfinder palette. This should subtract the circle from the square.
- Now select the original square and circle and choose Unite under Shape Modes in the Pathfinder palette. This should add the circle to the square. Note that the remaining shape inherits the properties (like color) of the shape that was on top.
- Optional: play around with some of the other options in the Pathfinder palette to discover what they can do.
Using the Appearance palette
- Continuing from above, select Window > Appearance
- Select the star shape.
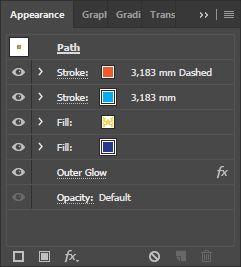
 In the Appearance palette, click the New Fill icon and drag this new fill to the bottom of the stack. Click the color picker and select a blue color.
- Click the New Stroke icon.
- Select the top stroke and change its color. Click on the underlined word Stroke. This opens up a quick ‘shortcut’ to the basic stroke settings.
- Under Caps select Round cap.
- Check Dashed Line and set the gap length to something that looks nice.
- Click the Add New Effect icon in the Appearance palette and select Stylize > Outer glow.
- For Mode select Normal and color it yellow. Make the blur big so it is clearly visible.
- Optional: play around with some of the other options in the Appearance palette to discover what they can do.
Using brushes
-
- Continuing from above, deselect the star shape by clicking an empty area with the Select tool.
- Press D to reset the shape properties to default.
- Select the ellips tool and draw a small circle. Color it green and set its outline to None.
- Select the line tool and draw a straight horizontal line next to the circle. Set the line color to purple and the stroke thickness to something visible.
- Click the word Stroke in the properties bar and select an arrowhead to apply to the end of the path. If it is too large, scale it down by setting a scale percentage.
- Now position the line starting point over the center of the circle. Make sure there is enough room between the arrowhead and the circle.
 Select Window > Brushes.
- Use the Select tool and hold Shift to select both shapes. Drag the shapes into the brushes panel.
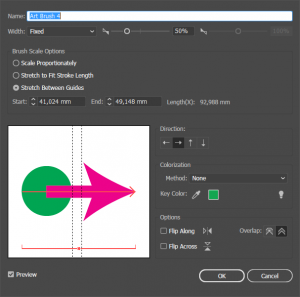
- In the dialog that pops up select Art Brush and click OK.
- Now choose Stretch between guides and place the guides between the circle and the arrowhead. Click OK.
- Deselect the shapes.
- Select the Paint brush tool and click the newly created brush.
- Draw some curvy lines.
- Optional: play around with some of the other options in the Art Brush Options dialog to discover what they can do. You can open these options by double-clicking the Brush in the Brush palette.
Materials needed:
- None
Hand in:
- Save your work as an AI file and upload it to Dropbox.